Updated for Version “Luna V”

Sangonomiya Kokomi is a 5-star Hydro Catalyst character in Genshin Impact who excels at healing, applies Hydro both on-field and off-field, and deals respectable personal damage. Learn about Kokomi’s best builds, best weapons, best artifacts, and best teams in this quick guide.
Note that the information given may change if new discoveries are made. More extensive testing is in progress.
The full-length guide is available here. It is currently outdated.
Join our Discord to check on and participate in the theorycrafting process.
Table of Contents
Infographic
On-Field Healer / Enabler
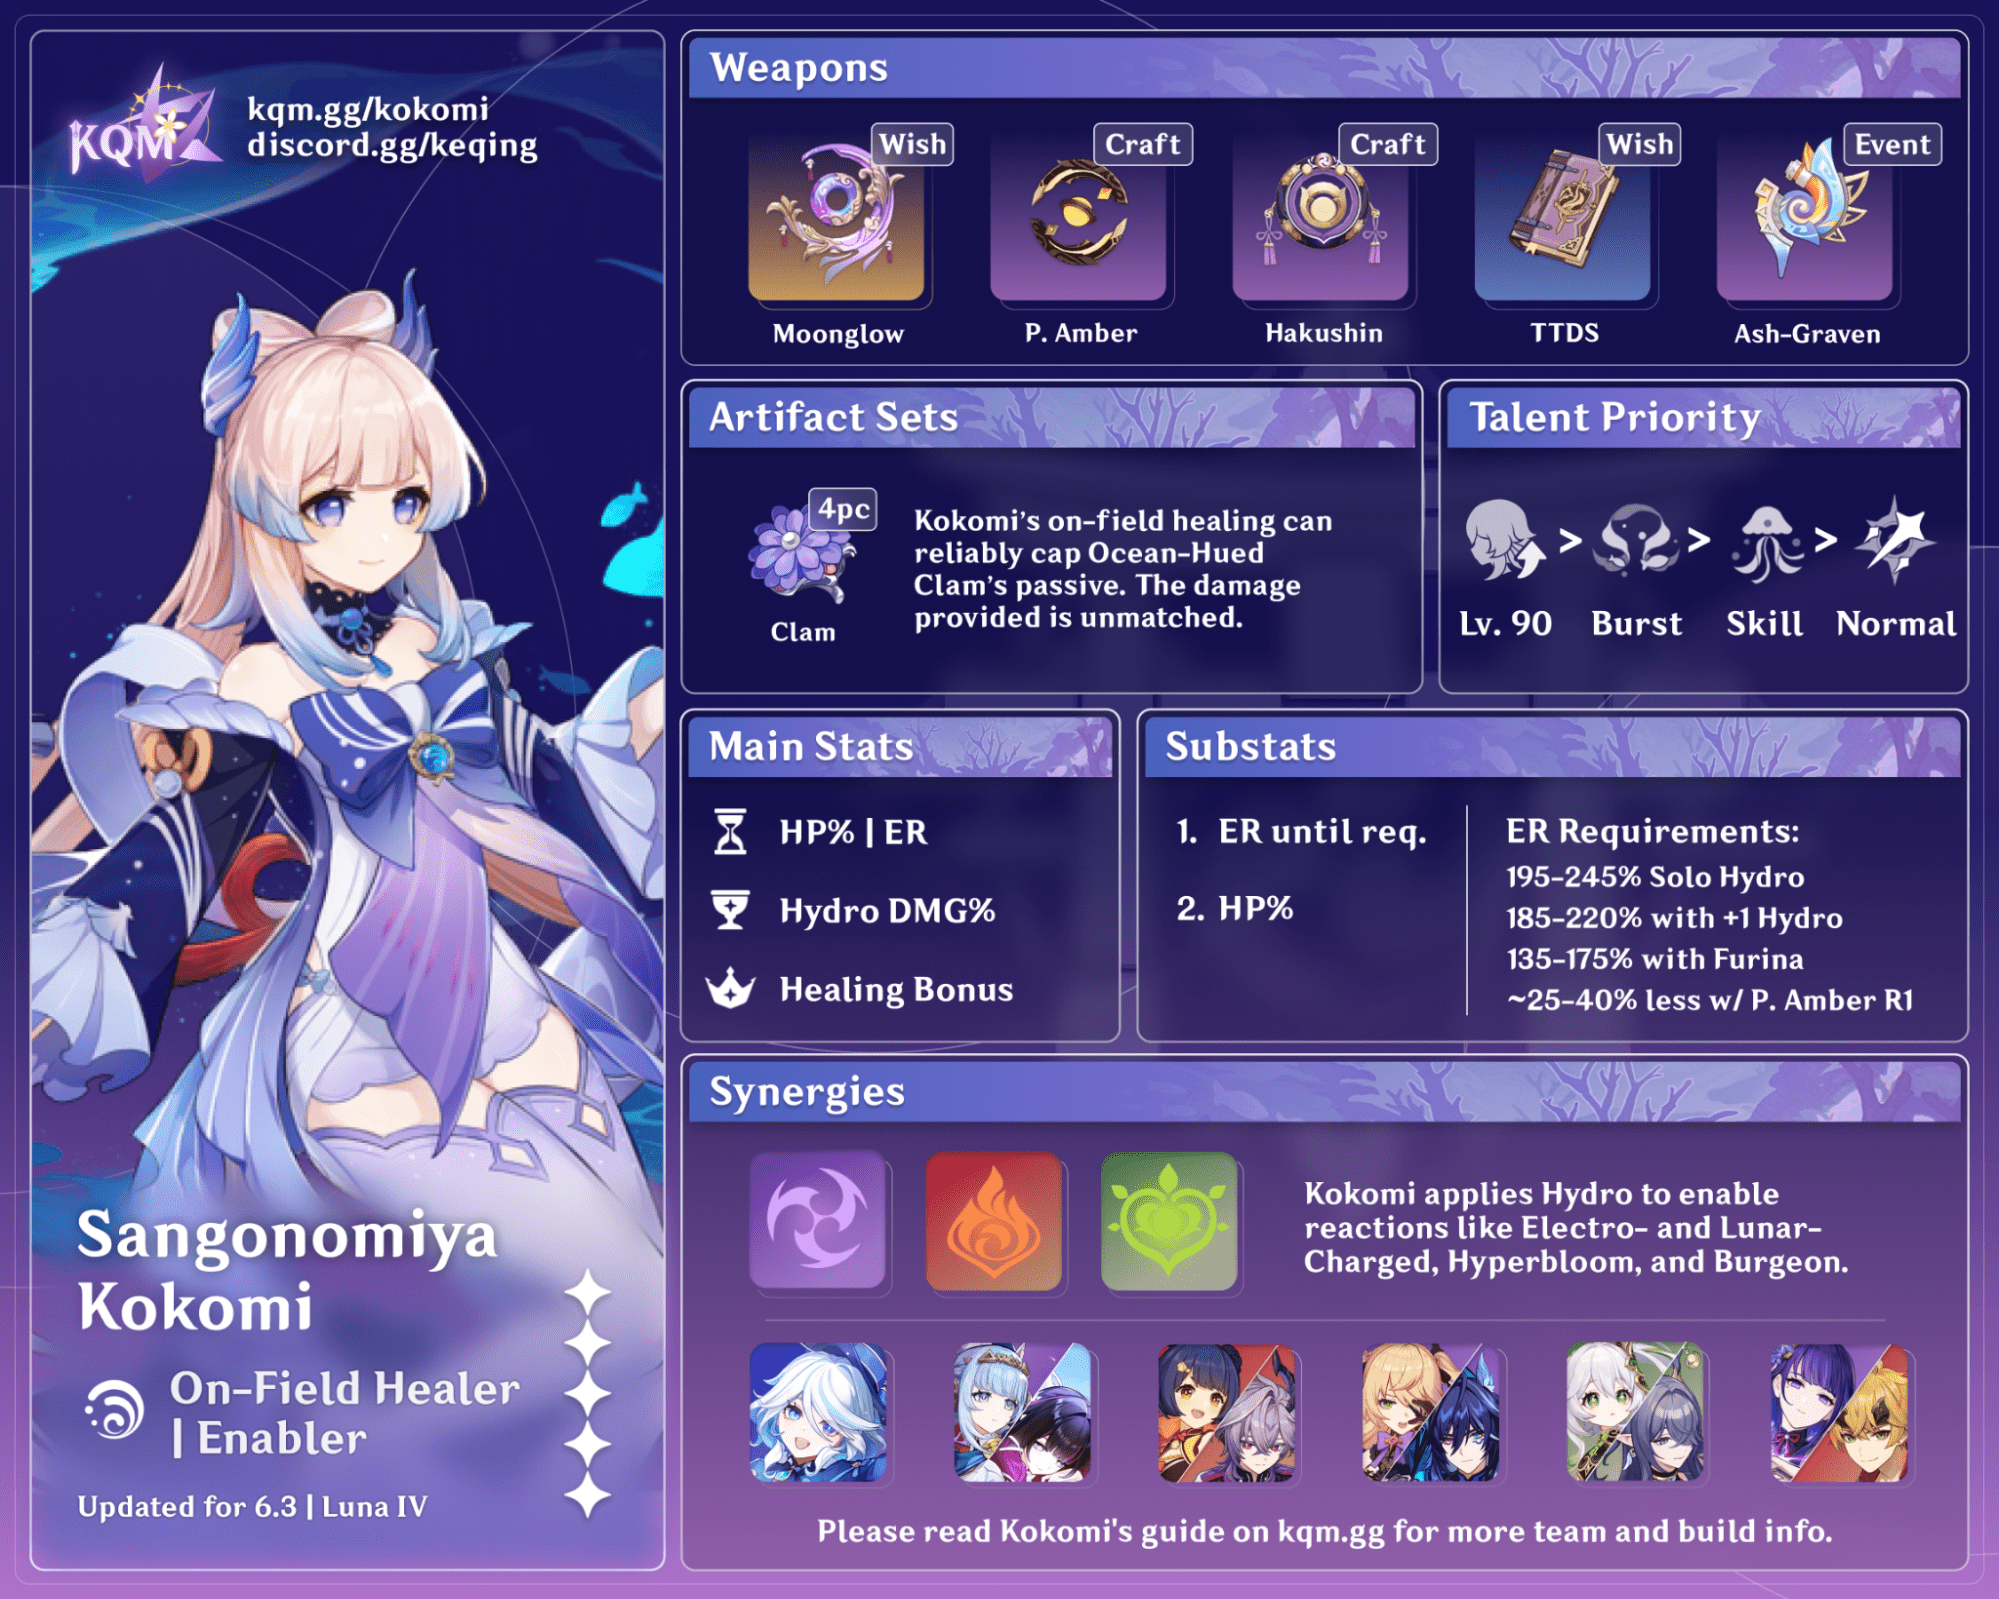
Credits: kolvii, cegewinne, baloopy, madeofseaglass, and KQM staff
Off-Field Support
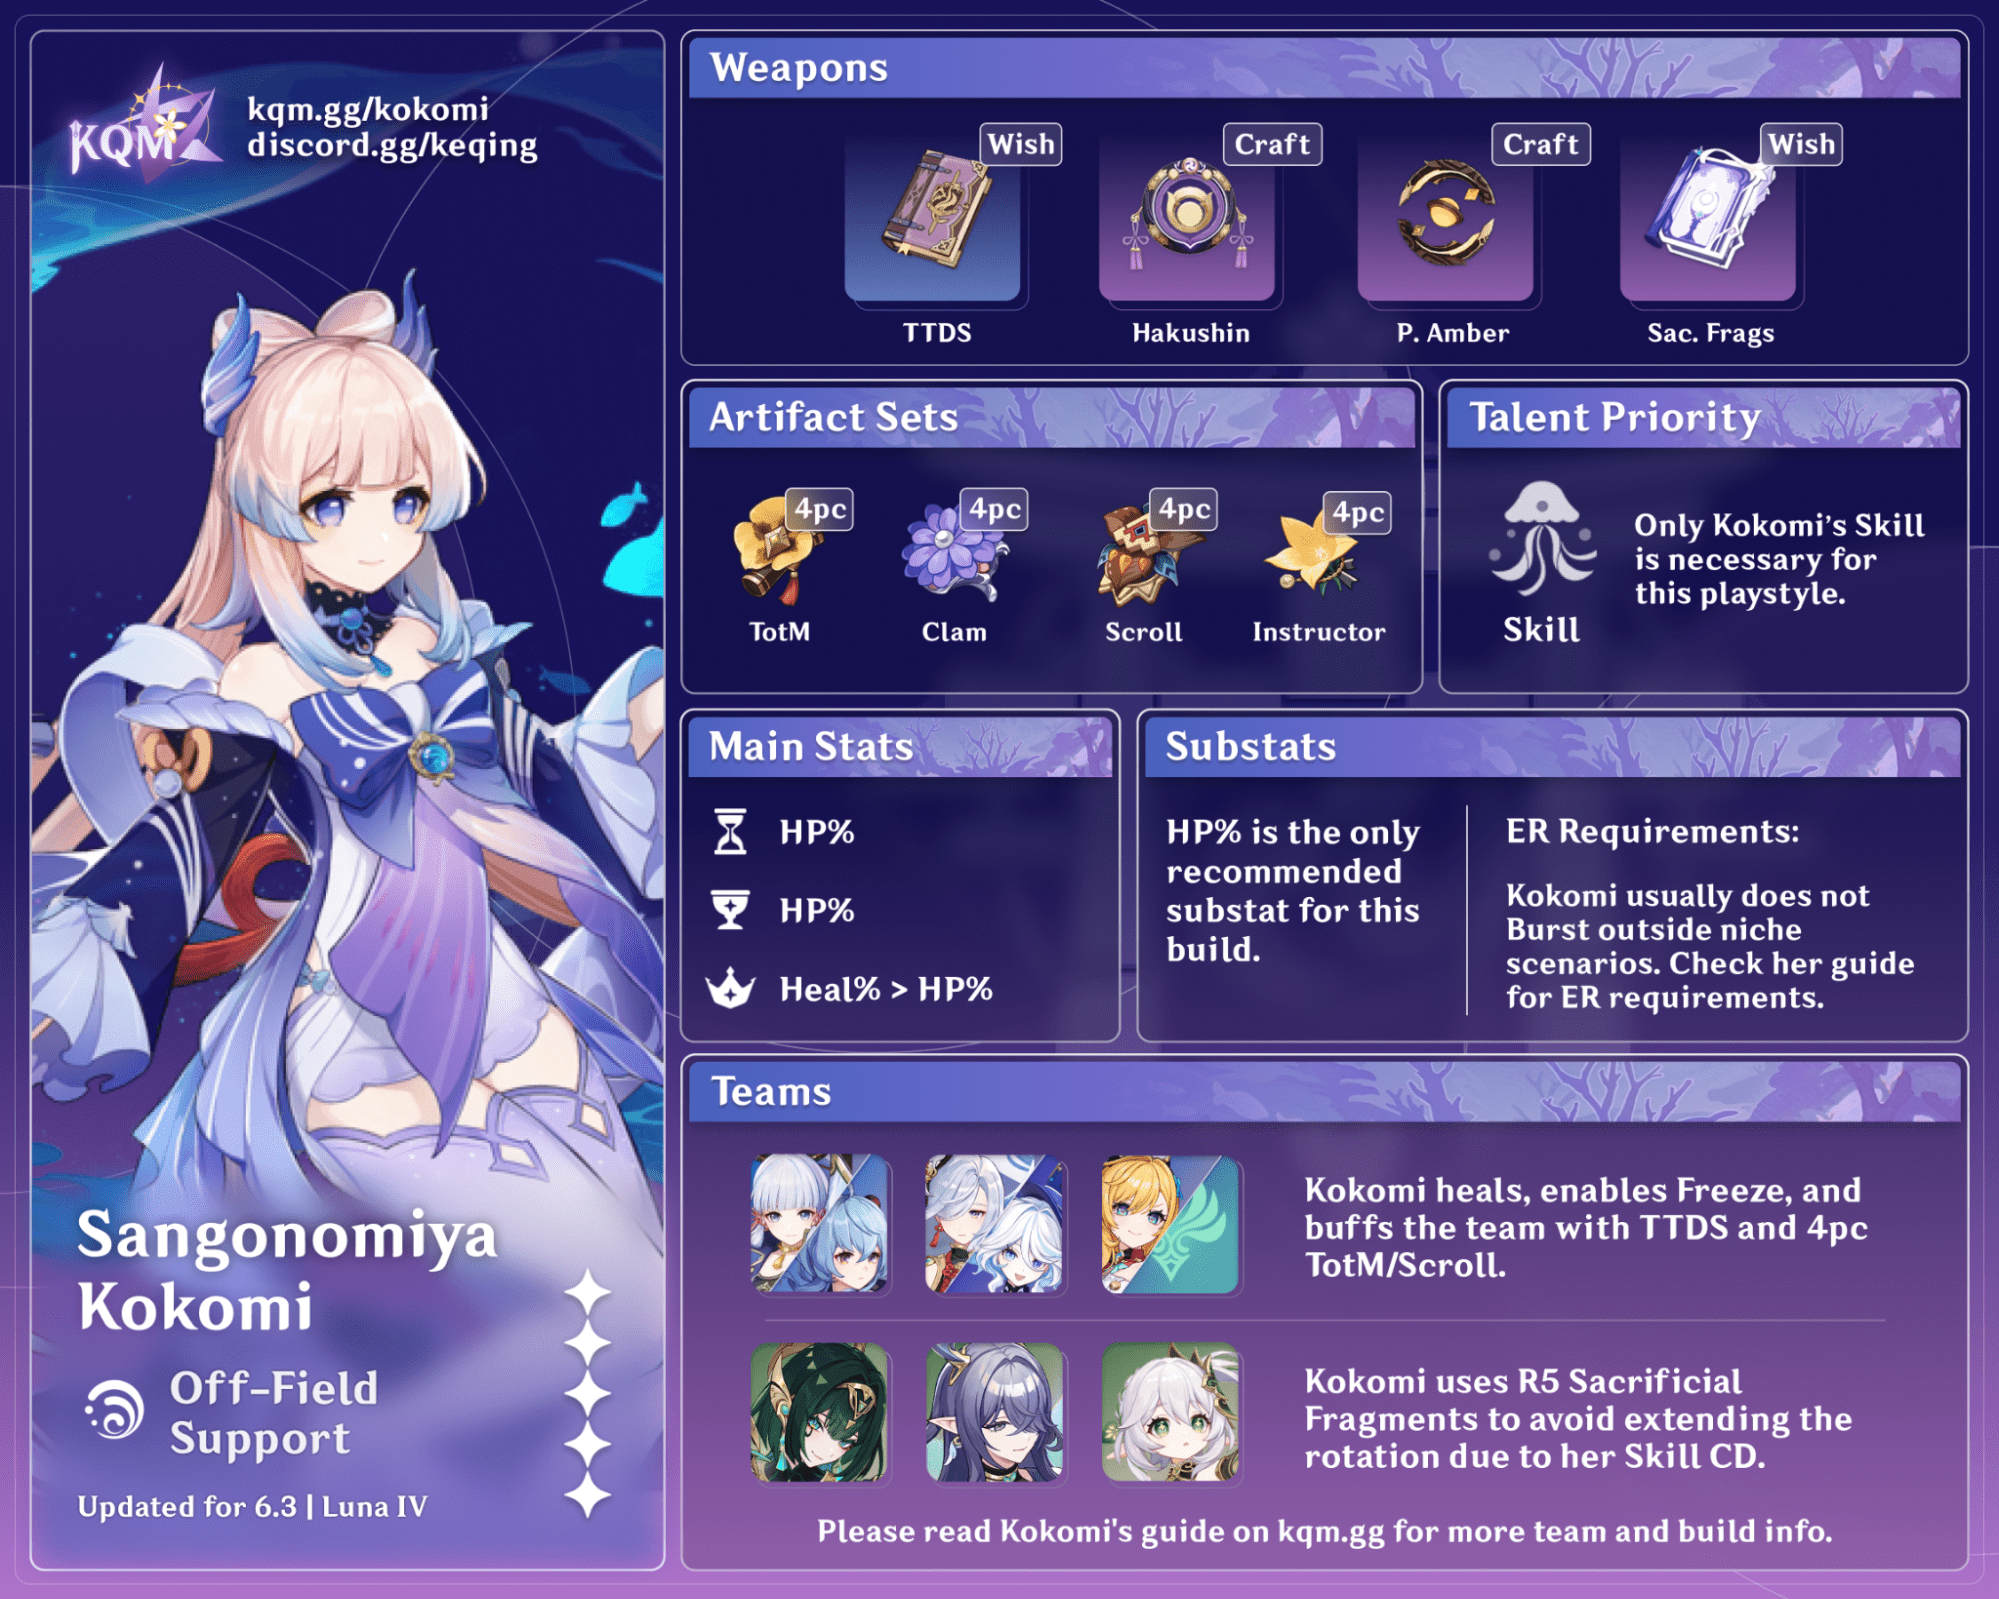
Credits: kolvii, cegewinne, baloopy, madeofseaglass, and KQM staff
Bloom DPS
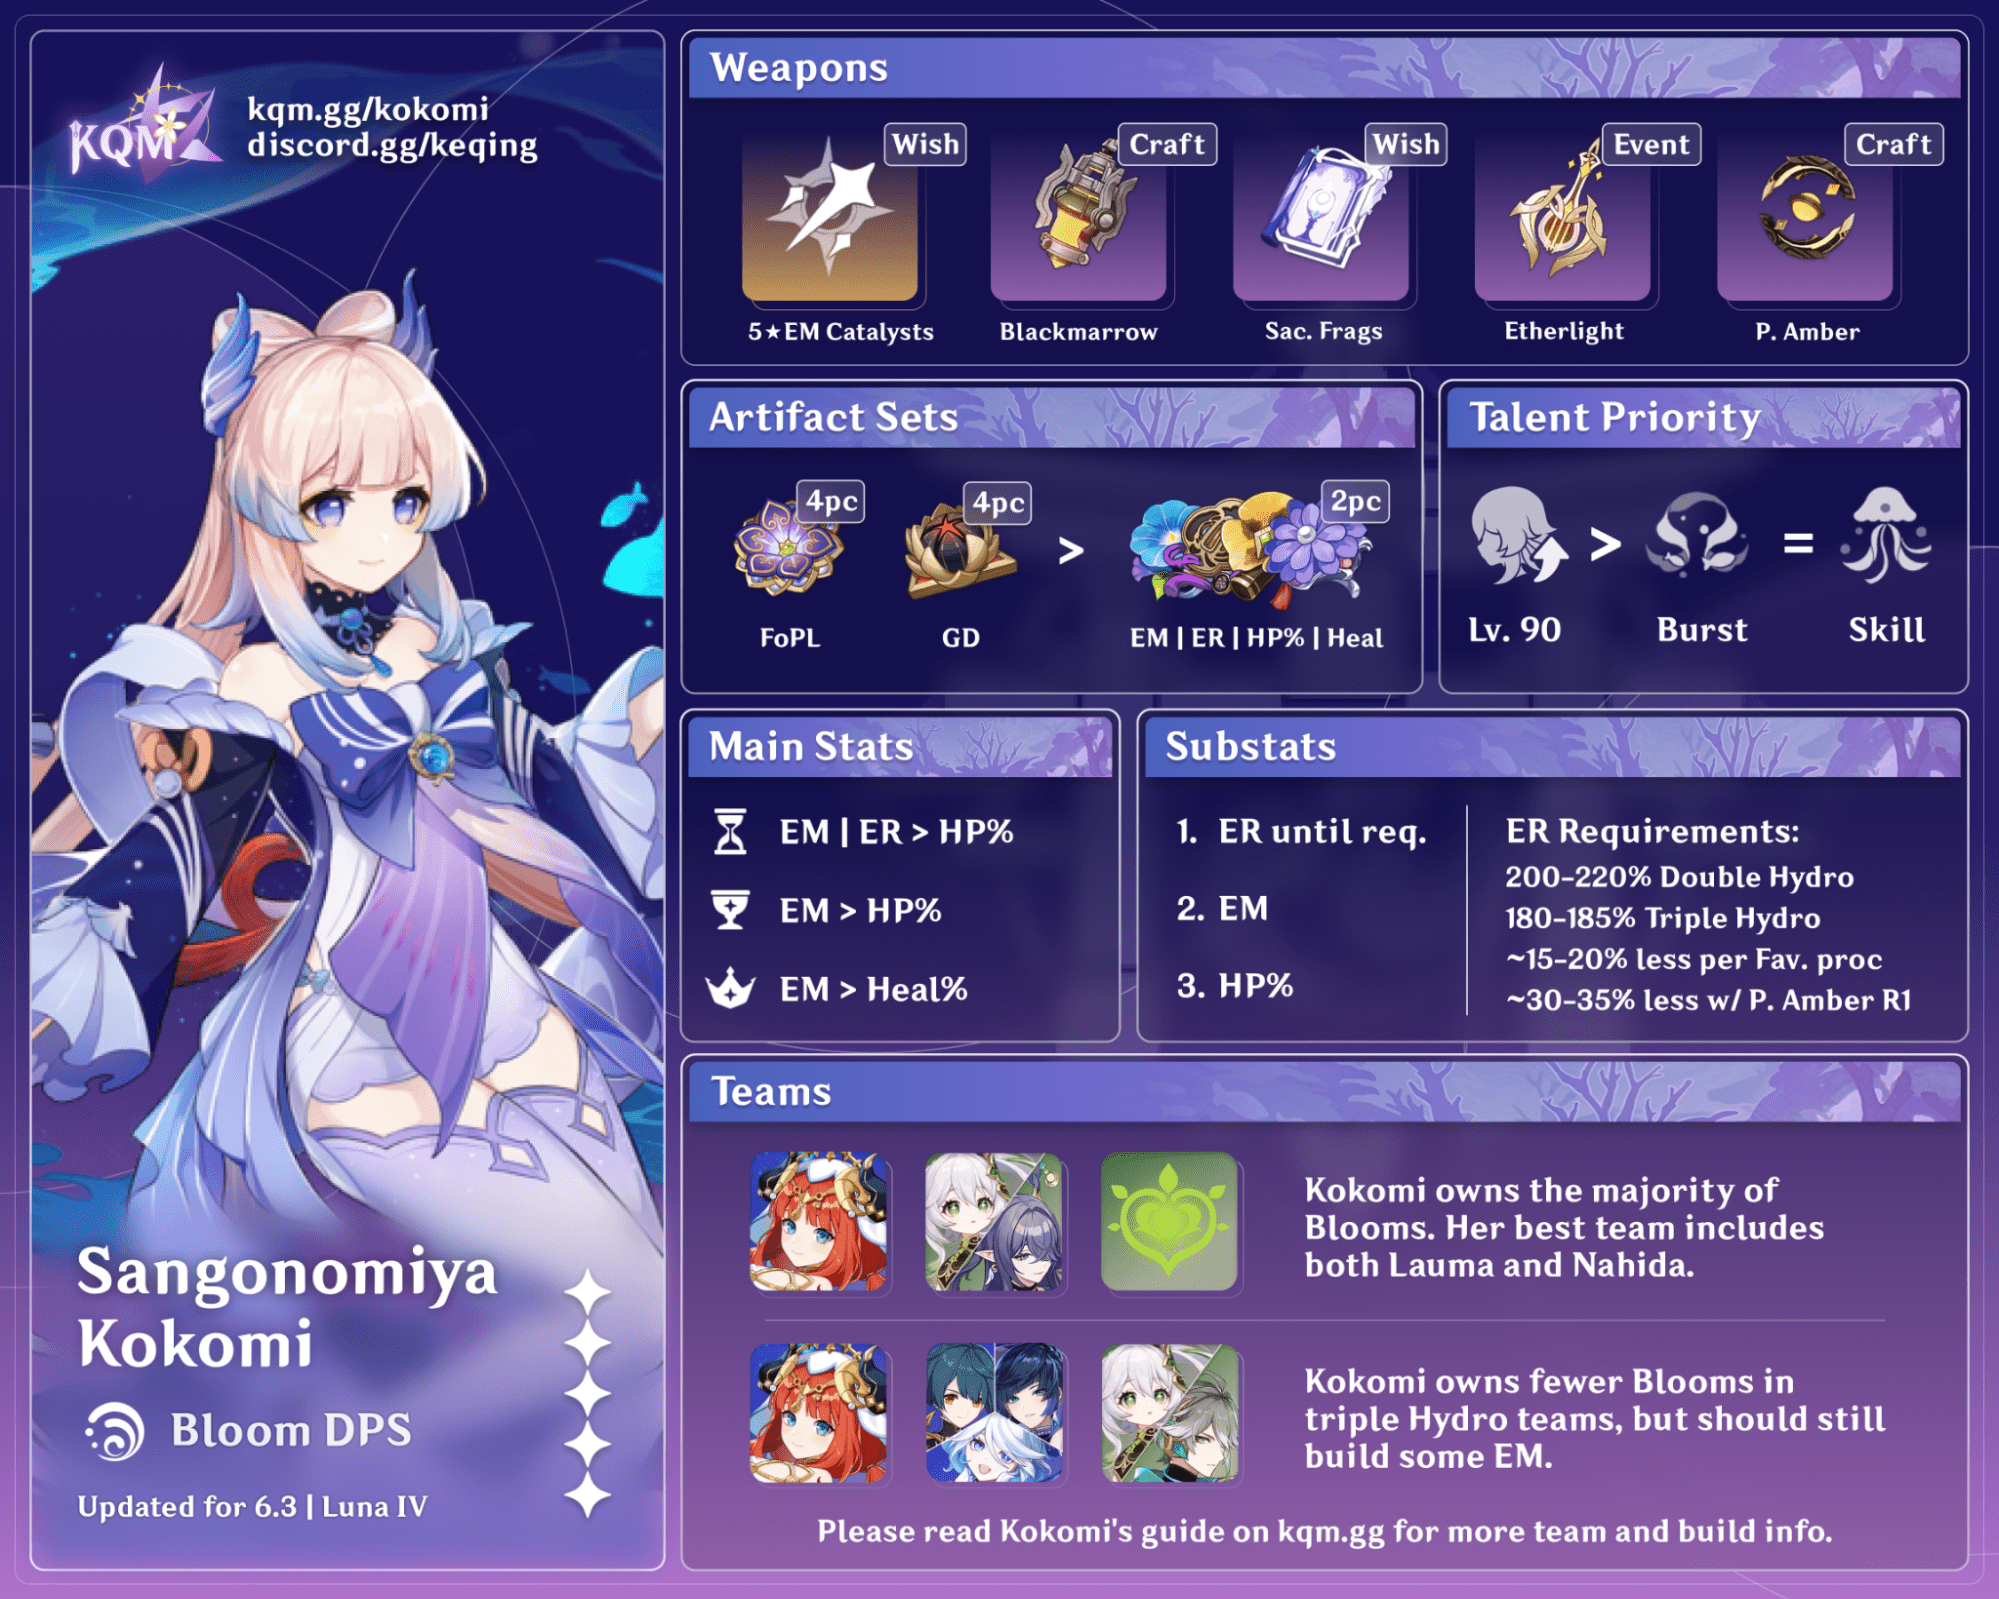
Credits: kolvii, cegewinne, baloopy, madeofseaglass, and KQM staff
Character Overview
Pros
- Excellent healing, especially in on-field playstyles
- Good Hydro application both on- and off-field
- Varied playstyles and flexible team building
- Easy and comfortable gameplay
- Plenty of accessible weapon options
- Easy to build, needing only HP and ER in most playstyles
Cons
- Enemies can move away from Kokomi’s jellyfish, reducing her off-field Hydro application and particle generation to zero
- Comparatively lower personal output compared to most on-field damage dealers
- Relatively low DPS gains with vertical investment
- Little synergy with Lunar Reactions due to her lack of CRIT
- Her 20s Skill cooldown limits her usability with characters who prefer shorter rotations
Playstyles
On-Field Healer / Enabler
Kokomi’s Burst enhances her Normal Attacks, allowing her to deal respectable damage as an on-field unit. She offers sustained healing (especially relevant for Furina teams) and can also enable Elemental Reactions with her Hydro application.
Off-Field Support
Kokomi can still supply healing and Hydro application when played off-field via her Skill. She can either forgo using her Burst entirely in this playstyle, or build enough ER to refresh her jellyfish partway through the rotation using her A1.
Bloom DPS
Kokomi excels in Nilou Bloom teams, triggering a large portion of the team’s Blooms with her sustained Hydro application while also providing healing for Bountiful Core self-damage. She can also be played off-field in triple Hydro Nilou comps, where her Bloom ownership is lower but can still be significant.
Talents
Level and Talent Priority
Level 90 = Elemental Skill ≥ Elemental Burst > Normal Attack
Leveling Kokomi to Lv. 90 is particularly valuable as both her healing and her personal damage scale off of HP, and reaction damage directly scales off of Character Level. This is particularly relevant in Nilou Bloom teams, where Kokomi can trigger a significant amount of Blooms.
Kokomi’s Elemental Skill provides the bulk of her healing, while her Burst contributes the bulk of her personal damage. On-field playstyles should level both, whereas off-field playstyles can ignore her Burst. Her Normal Attacks contribute the least to her damage, and they can be leveled last, or ignored if playing her strictly off-field.
Note that if Kokomi is used as an off-field support, it is better to first invest in the team’s damage dealers. Kokomi’s damage is negligible in this role and her healing is often sufficient at low investment levels.
Talent Overview
 Normal Attack | The Shape of Water
Talent Description
Normal Attack
Performs up to 3 consecutive attacks that take the form of swimming fish, dealing Hydro DMG.
Charged Attack
Consumes a certain amount of Stamina to deal AoE Hydro DMG after a short casting time.
Plunging Attack
Gathering the might of Hydro, Kokomi plunges towards the ground from mid-air, damaging all opponents in her path. Deals AoE Hydro DMG upon impact with the ground.
Kokomi’s Normal Attack Talent offers insignificant damage even for on-field playstyles. During her Elemental Burst, the majority of Kokomi’s Normal and Charged Attack damage comes from the additional HP scaling based on her Burst’s Talent level.
 Elemental Skill | Kurage’s Oath
Talent Description
Summons a “Bake-Kurage” created from water that can heal her allies.
Using this skill will apply the Wet status to Sangonomiya Kokomi.
Bake-Kurage
Deals Hydro DMG to surrounding opponents and heal nearby active characters at fixed intervals. This healing is based on Kokomi’s Max HP.
Kokomi’s Elemental Skill is the backbone of her kit. Her “Bake-Kurage” jellyfish provides healing, AoE Hydro application, Energy, and potential buffs through artifact sets like Tenacity of the Millelith or Deepwood Memories. It heals and applies Hydro every 2s, and each hit has a 67% chance of generating 1 Hydro Particle.
Its major downsides are its long cooldown (20s) and the stationary nature of the Bake-Kurage. Kokomi cannot easily reposition her jellyfish, so players must carefully consider its placement, and her teams benefit heavily from grouping to keep enemies in range. In teams where her Hydro application is crucial (such as in Nilou Bloom), she may equip Sacrificial Fragments to reset her Skill’s cooldown, allowing for more flexibility in positioning.
 Elemental Burst | Nereid’s Ascension
Talent Description
Summons the might of Watatsumi, dealing Hydro DMG to surrounding opponents, before robing Kokomi in a Ceremonial Garment made from the flowing waters of Sangonomiya.
Ceremonial Garment
- Sangonomiya Kokomi’s Normal Attack, Charged Attack and Bake-Kurage DMG are increased based on her Max HP.
- When her Normal and Charged Attacks hit opponents, Kokomi will restore HP for all nearby party members, and the amount restored is based on her Max HP.
- Increases Sangonomiya Kokomi’s resistance to interruption and allows her to walk on the water’s surface.
These effects will be cleared once Sangonomiya Kokomi leaves the field.
Kokomi’s Burst greatly increases the damage of her Normal and Charged Attacks, and causes them to provide party-wide healing on hit. This Talent represents Kokomi’s largest source of personal damage when played on-field. Off-field, however, its only utility is activating her Ascension 1 Passive.
 Ascension 1 Passive | Tamakushi Casket
Talent Description
If Sangonomiya Kokomi’s own Bake-Kurage are on the field when she uses Nereid’s Ascension, the Bake-Kurage’s duration will be refreshed.
This useful Passive allows Kokomi to refresh the duration of her Bake-Kurage jellyfish. To take advantage of this, her Burst must be used before the Bake-Kurage’s initial duration expires: her A1 Talent will refresh the duration of an existing jellyfish, but it will not create a new one or affect her Skill’s cooldown in any way. Note that this Passive only refreshes the ability; it does not reposition it.
 Ascension 4 Passive | Song of Pearls
Talent Description
While donning the Ceremonial Garment created by Nereid’s Ascension, the Normal and Charged Attack DMG Bonus Sangonomiya Kokomi gains based on her Max HP will receive a further increase based on 15% of her Healing Bonus.
This Talent converts Healing Bonus into extra damage for Kokomi’s Burst-enhanced Normal and Charged Attacks, which incentivizes using a Healing Bonus Circlet. This Talent generally represents over half the total damage increase granted by her Burst state.
 Utility Passive | Flawless Strategy
Talent Description
Sangonomiya Kokomi has a 25% Healing Bonus, but a 100% decrease in CRIT Rate.
A unique (and notorious) passive. The massive, permanent CRIT Rate debuff not only invalidates traditional CRIT builds, but also prevents her from triggering Favonius Codex’s passive in most cases (there are exceptions; see the weapons section for more). In return, it gives her even more Healing Bonus, which synergizes with her A4 Passive.
This Passive, in conjunction with Kokomi’s other Talents, makes Healing Bonus equally valuable for offense and defense. It also allows her to forgo CRIT, making her much less reliant on Artifact substats in contrast to most other damage dealers.
Constellations
 Constellation 1 | At Water’s Edge
Constellation Description
While donning the Ceremonial Garment created by Nereid’s Ascension, the final Normal Attack in Sangonomiya Kokomi’s combo will unleash a swimming fish to deal 30% of her Max HP as Hydro DMG.
This DMG is not considered Normal Attack DMG.
The 30% HP multiplier of the extra attack is fixed and unaffected by Talent Levels or Normal Attack DMG% bonuses. The fish does not share an ICD with her Normal Attacks, adding an extra instance of Hydro application. This Constellation encourages you to use her N3 combos.
 Constellation 2 | The Clouds Like Waves Rippling
Constellation Description
Sangonomiya Kokomi gains the following Healing Bonuses with regard to characters with 50% or less HP via the following methods:
- Kurage’s Oath Bake-Kurage: 4.5% of Kokomi’s Max HP.
- Nereid’s Ascension Normal and Charged Attacks: 0.6% of Kokomi’s Max HP.
Adds some extra healing when units fall below 50% HP, but this is largely unnecessary given how much Kokomi heals already.
 Constellation 3 | The Moon, A Ship O’er the Seas
Constellation Description
Increases the Level of Nereid’s Ascension by 3.
Maximum upgrade level is 15.
The extra Talent levels increase her Burst’s HP-based damage scaling. However, they do not affect her Ascension 4 Passive, lowering the value of this Constellation.
 Constellation 4 | The Moon Overlooks the Waters
Constellation Description
While donning the Ceremonial Garment created by Nereid’s Ascension, Sangonomiya Kokomi’s Normal Attack SPD is increased by 10%, and Normal Attacks that hit opponents will restore 0.8 Energy for her.
This effect can occur once every 0.2s.
Because Kokomi is a Catalyst user and doesn’t possess hitlag on her Normal Attacks, she can take full advantage of the ATK SPD. The Energy restoration it brings is a cherry on top.
 Constellation 5 | All Streams Flow to the Sea
Constellation Description
Increases the Level of Kurage’s Oath by 3.
Maximum upgrade level is 15.
Fairly underwhelming. Offers a slight increase to her Skill’s ATK scaling for a negligible damage gain. Its healing is also redundant as Kokomi’s healing is already sufficient at lower investment.
 Constellation 6 | Sango Isshin
Constellation Description
While donning the Ceremonial Garment created by Nereid’s Ascension, Sangonomiya Kokomi gains a 40% Hydro DMG Bonus for 4s when her Normal and Charged Attacks heal, or would heal, any party member with 80% or more HP.
This Constellation offers a sizable Hydro DMG% buff which is fairly easy to trigger, given Kokomi’s immense healing while in her Burst.
Combos
Combo Notation
- N = Normal Attack
- C = Charged Attack
- A = Aimed Shot
- P = Plunging Attack
- E = Elemental Skill
- tE = Tap Skill
- hE = Hold Skill
- Q = Elemental Burst
- D = dash (cancel)
- J = jump (cancel)
- W = walk (cancel)
- > = switch character
- ( ) = these actions are optional; please refer to the notes below
- [ ] = repeat these actions the specified number of times
Note that Kokomi’s combos may change as new combos are tested. More extensive testing is in progress.
It is not recommended to use Kokomi’s Charged Attacks frequently because they quickly consume her Stamina; however, they can be situationally useful for extra Hydro application, shield-breaking, or AoE damage. Players should adapt to the situation at hand. Similarly, there is no need to follow a strict order of specific attack sequences; the following combos are simply guidelines.
| N3D | Usually Kokomi’s best combo, due to its ease of use and on-field driving capabilities. While it does output marginally lower damage compared to N2, its ability to benefit from Kokomi’s Constellation 1 makes it outpace other combos once C1 is acquired. Performing the dash cancel is not mandatory but can be done to increase DPS. |
| N2D | Can provide slightly higher damage output and Hydro application at C0, and is often better at driving on-hit abilities like Beidou’s Burst. |
| N2C / N3C | These combos can be used for extra AoE Hydro application, which is useful primarily in Overvape and Nilou Bloom teams. They are stamina intensive, however. |
ER Requirements
Calcs for ER requirements can be found here (last updated for Version “Luna IV”).
On-Field
| Base | P. Amber R1 | P. Amber R5 | |
| Solo Hydro | 195–245% | 160–205% | 145–180% |
| Double Hydro | 185–220% | 150–170% | 135–150% |
| Double Hydro w/ Furina | 135–175% | 110–145% | 100–130% |
Off-Field
| Base | P. Amber R1 | P. Amber R5 |
| 260–315% | 215–260% | 195–235% |
Each additional Favonius proc from teammates reduces her ER requirements by approximately 15–25% (but it can be over 40% if her ER needs are very high).
Use the Energy Recharge Calculator to determine exact requirements for your team and rotation. For more details on how Favonius weapons will affect your team, please use Ac1d’s Favonius Mastersheet.
On-Field Healer / Enabler
Artifact Stats
 Sands |  Goblet |  Circlet |
| HP% or Energy Recharge | Hydro DMG Bonus > HP% | Healing Bonus |
Stat Priority: ER (until requirement) > HP% > Flat HP
HP% / Hydro / HB is usually Kokomi’s best option on-field for personal damage and healing, but an ER Sands should be used if necessary to meet ER requirements. If you don’t have a Hydro DMG% Goblet to spare, an HP% one can be used instead.
Artifact Sets
Hover over artifact images for more information.
 4pc Ocean-Hued Clam (OHC) | Recommended for on-field builds. Its 2pc effect grants Healing Bonus, and its 4pc effect easily caps out during Kokomi’s Burst, making it often the best choice for both comfort and maximizing DPS. When in doubt, equip this set. |
 4pc Tenacity of the Millelith (TotM) | Depending on how much the team benefits from its ATK% buff, this set can sometimes lead to higher team DPS than 4pc OHC. |
 4pc Scroll of the Hero of Cinder City (Scroll) | Though she cannot activate this set’s full passive, Kokomi can maintain its smaller 12% DMG buff in most teams, which is helpful for damage dealers who benefit more from DMG% than ATK%. She can also benefit from the 2pc Energy regen in teams with Nightsoul characters. |
 4pc Deepwood Memories | If no one else holds it already, Kokomi should equip this set in Hyperbloom and Burgeon teams for the Dendro RES Shred it provides. Kokomi can equip this set with minimal opportunity cost to allow other units to run sets that are better for their personal damage. |
 4pc Silken Moon’s Serenade (SMS) | In teams with Nod-Krai units, Kokomi can equip this set to provide a team EM buff, freeing up her Nod-Krai teammates to equip more offensive sets like 4pc Aubade. |
Weapons
Hover over weapon images for more information.
 5★ Everlasting Moonglow | Kokomi’s signature weapon boosts her healing and personal damage while also reducing ER requirements as an on-field enabler. Her best weapon for personal damage, but only by a small margin. |
 5★ Jadefall’s Splendor | A very small damage gain over Prototype Amber when ER needs are low. Not recommended to pull specifically for Kokomi. |
 4★ Prototype Amber | Kokomi’s go-to weapon in most scenarios, providing the best healing output along with competitive damage and powerful Energy regen. |
 4★ Ash-Graven Drinking Horn | This event weapon provides more damage than Prototype Amber when ER needs are low. It is not worth using at higher ER needs, as it does nothing to help with Energy. |
 4★ Hakushin Ring | A potent option when paired with Electro units, granting teamwide Hydro and Electro DMG% buffs. Its ER secondary stat helps meet Kokomi’s ER requirements. |
 3★ Thrilling Tales of Dragon Slayers (TTDS) | Can be Kokomi’s best option when supporting an ATK-scaling DPS who can snapshot the buff (e.g. Fischl). Unlike many other Catalyst users, Kokomi actually benefits from its HP% substat. |
 4★ Favonius Codex | Kokomi normally cannot trigger this weapon’s passive. She can do so, however, in Lunar-Charged teams: Lunar-Charged CRITs will trigger the passive as long as Kokomi is a reaction contributor, regardless of whose stats caused the reaction to CRIT. Kokomi can thus take advantage of her teammates’ CRIT stats to trigger Favonius while on-field, reducing team ER requirements. |
 4★ Sacrificial Fragments | Basically an on-demand jellyfish repositioner. Doesn’t do much else for Kokomi outside of Bloom teams. |
 5★ A Thousand Floating Dreams | Offers a small EM buff in Hyperbloom and Burgeon teams. |
Off-Field Support
Artifact Stats
Sands | Goblet | Circlet |
| HP% or Energy Recharge | HP% | Healing Bonus |
Stat Priority: ER (until requirement) > HP% > Flat HP
Off-field Kokomi is often played in Skill-only rotations where she can forgo building ER entirely. If Bursting every rotation to refresh uptime on her jellyfish, however, she will likely need an ER Sands to meet her very high off-field ER requirements.
Without field-time during her Burst, she won’t deal much damage, so an HP% Goblet can be used to increase her Bake-Kurage healing instead.
Artifact Sets
Hover over artifact images for more information.
4pc Tenacity of the Millelith (TotM) | A good option when Kokomi is used as an off-field support. Her Bake-Kurage can maintain high uptime on the teamwide ATK buff, especially in Freeze teams, where enemies cannot move away from it. The HP% 2pc effect is a nice bonus to her healing as well. |
4pc Scroll of the Hero of Cinder City (Scroll) | An alternative to 4pc TotM for teams who benefit more from DMG% than ATK%. Though she cannot activate this set’s full passive, Kokomi can maintain its smaller 12% DMG buff in most teams as it triggers from off-field. She can also benefit from the 2pc Energy regen in teams with Nightsoul characters. |
 4pc Song of Days Past | This set gives an Additive DMG Bonus to the active character based on Kokomi’s healing, but only buffs the on-field character and is less consistent than TotM or Scroll. |
4pc Deepwood Memories | Kokomi can equip this set in teams that deal significant Dendro damage with minimal opportunity cost, allowing other units to run sets that are better for their personal damage. |
4pc Silken Moon’s Serenade (SMS) | In teams with Nod-Krai units, Kokomi can equip this set to provide a team EM buff, freeing up her Nod-Krai teammates to equip more offensive sets like 4pc Aubade. |
 4pc Instructor | This set provides a large EM buff as long as Kokomi can trigger a reaction while on the field. Kokomi’s healing is good enough that the stat deficit from using a 4-star set isn’t a big deal, especially in Skill-only teams where she doesn’t have to worry about building ER. |
4pc Ocean-Hued Clam | Baseline option if none of the buffing sets above are useful or necessary. |
Weapons
Hover over weapon images for more information.
3★ Thrilling Tales of Dragon Slayers (TTDS) | Kokomi’s go-to as an off-field support for ATK-scaling on-field damage dealers. Unlike many other Catalyst users, Kokomi actually benefits from its HP% substat. |
4★ Prototype Amber | If using Kokomi’s Burst to refresh her jellyfish, this weapon’s passive is very helpful for meeting her ER requirements as well as providing some additional party-wide healing. For a Skill-only playstyle, it’s just an HP stat stick. |
4★ Hakushin Ring | Kokomi must be on-field to trigger this weapon’s passive, limiting its efficacy for her off-field playstyle, but the buff can be snapshot by units like Fischl. |
4★ Sacrificial Fragments | Basically an on-demand jellyfish repositioner. Doesn’t do much else for Kokomi outside of Bloom teams. |
5★ Everlasting Moonglow, Jadefall’s Splendor | 5-star HP stat sticks. Their passives are negligible for Kokomi’s off-field playstyle. |
5★ A Thousand Floating Dreams | Offers a small EM buff in Hyperbloom and Burgeon teams. |
4★ Ash-Graven Drinking Horn | An HP stat stick that lets Kokomi contribute a bit of extra damage. |
Bloom DPS
Artifact Stats
Sands | Goblet | Circlet |
| EM / ER / HP% | EM / HP% | EM / Healing Bonus |
Stat Priority: ER (until requirement) > EM > HP% > Flat HP
EM mainstats are recommended for most Nilou Bloom teams, as Kokomi has high Bloom ownership and can deal a significant portion of the team’s damage. An ER Sands can be used if necessary to meet ER requirements.
HP% or Healing Bonus main stats can be mixed in if more healing is needed. Select whatever piece has the best EM substats.
In triple Hydro Nilou comps where Kokomi is played off-field, she will not own the majority of Blooms (though she will still own some), and it can make sense to prioritize her healing first and EM second.
Artifact Sets
Hover over artifact images for more information.
 4pc Flower of Paradise Lost (FoPL) | Maximizes Kokomi’s Bloom damage, but comes from a highly resin-inefficient domain. Still, it is Kokomi’s best set for Bloom damage, so it can be worthwhile to strongbox it. |
 4pc Gilded Dreams (GD) | The most recommended artifact set in double Dendro comps where Kokomi has high Bloom ownership, providing 180 EM with an easily triggered 4pc effect. It shares a domain with Deepwood Memories, making it highly resin-efficient to farm. |
4pc Deepwood Memories | Kokomi should hold this set if no one else on the team does, but it is often better suited to one of the Dendro units. She becomes a more viable holder in triple Hydro comps where her personal Bloom damage is lower. |
4pc Ocean-Hued Clam (OHC) | A good option for triple Hydro teams where Kokomi owns fewer Blooms and will benefit more from the 2pc Healing Bonus and AoE damage from the 4pc passive. |
| 2pc + 2pc EM / ER / HP% / Healing Bonus | Viable options if you lack a 4pc set with the right main stats. EM bonuses boost Kokomi’s Bloom damage, while HP% and Healing Bonus improve her healing. ER bonuses can be helpful in meeting ER requirements. 2pc + 2pc EM can be a good option for off-field Kokomi in triple Hydro to maximize her EM stats, providing more EM than 4pc GD in such cases. |
Weapons
Hover over weapon images for more information.
| 5★ Sunny Morning Sleep-In, Starcaller’s Watch, Nightweaver’s Looking Glass, A Thousand Floating Dreams | 5-star EM stat sticks. Kokomi’s ability to activate their passives varies, but all provide about 300-400 EM in total for her. |
 4★ Blackmarrow Lantern | With a hefty chunk of EM and a Bloom DMG buff, Blackmarrow Lantern is likely Kokomi’s best 4-star option for this playstyle, though some players may prefer Sacrificial Fragments for the repositioning utility. |
4★ Sacrificial Fragments | Not only does Sacrificial Fragments have an EM secondary stat, it also allows Kokomi to reposition her Bake-Kurage via extra Skill casts to maintain Hydro application. This can be very useful against mobile or dispersed opponents, especially since Nilou Bloom teams lack the ability to use Anemo supports for grouping. |
 4★ Etherlight Spindlelute | This event weapon with an ER secondary stat is a good choice for when Kokomi’s ER needs are high. Kokomi can maintain full uptime on the EM buff in most rotations. |
4★ Favonius Codex | Despite having negative CRIT Rate, Kokomi can proc this weapon’s passive in teams where Bloom can CRIT, e.g. with Lauma or C2 Nahida (though she must trigger the Bloom reaction herself for it to count). Blooms have a low base CRIT chance of 15%, but it is possible to produce many of them very quickly, and Kokomi’s high on-field Bloom ownership makes this weapon a consistent option for team Energy economy in such cases. Lauma and Nahida both have valuable Bursts, but do not catch many of their own particles, and their ER needs can be quite high; as such, they greatly benefit from the additional particles this weapon provides, and being able to build more EM instead of ER means bigger buffs from Nahida’s A1 and Lauma’s Moonsign passive. |
5★ Everlasting Moonglow | Kokomi’s signature weapon boosts her healing and Talent damage while also reducing her ER requirements. The large amount of HP from its secondary stat makes it easier for Kokomi to build full EM for her artifacts without sacrificing healing. |
4★ Prototype Amber | A craftable weapon that closely competes with Everlasting Moonglow by providing similar bonuses. Its Energy restoring passive is extremely helpful in meeting Kokomi’s ER requirements. |
 4★ Fruit of Fulfillment | Another craftable weapon. Its secondary stat is competitive with R1-4 Prototype Amber in reducing ER requirements, but instead of additional HP% and healing it provides a decent chunk of EM (180 with full stacks at R5). |
 3★ Magic Guide | A baseline option if you lack the other Catalysts on this list, providing decent EM from its secondary stat. The passive doesn’t see much uptime in Nilou Bloom teams as the Hydro aura is typically consumed by Dendro. |
Teams
Rotation Notation
- N = Normal Attack
- C = Charged Attack
- A = Aimed Shot
- P = Plunging Attack
- E = Elemental Skill
- tE = Tap Skill
- hE = Hold Skill
- Q = Elemental Burst
- D = dash (cancel)
- J = jump (cancel)
- W = walk (cancel)
- > = switch character
- ( ) = these actions are optional; please refer to the notes below
- [ ] = repeat these actions the specified number of times
Freeze

Kokomi’s Skill provides healing and sufficient AoE Hydro application to maintain Frozen, especially when its duration is extended with her A1 Passive. She can also equip TTDS and ToTM to provide buffs for the team’s DPS units.
The flex slot tends to be an Anemo unit, Skirk teams being the exception.
Notable Teammates
 Ayaka | Kokomi provides Ayaka with snapshottable buffs, and the Bake-Kurage’s consistent AoE Hydro application easily maintains Freeze for the duration of Ayaka’s Burst, preventing Freezeable enemies from escaping its AoE. |
 Ganyu | Ganyu is another Cryo Burst DPS whose Burst can snapshot buffs. Kokomi’s longer cooldowns and short field time often encourage longer rotations that make greater use of Ganyu’s Charged Attacks. |
 Skirk | Skirk favors teams composed of Hydro and Cryo characters only, making Kokomi easy to slot in as an off-field healer and support unit. |
 Escoffier | Escoffier provides 55% RES Shred for Hydro and Cryo damage as long as the team is composed of only Hydro and Cryo characters. With Kokomi covering healing, Escoffier can forgo using her Burst and build purely to maximize her considerable damage contribution. |
 Furina | Furina provides good off-field damage and a large party-wide DMG% buff, but requires a strong healer to stack her Fanfare, making Kokomi a synergistic choice. This works best in Skirk teams that can more easily accommodate 2 Hydro. |
 Kazuha | Kazuha brings grouping, RES Shred via 4pc Viridescent Venerer, and large amounts of Elemental DMG Bonus. Double Swirl setups can allow Kazuha to buff both Cryo and Hydro DMG with VV Shred and his A4 Passive, which is useful in variants where Kokomi is used in an on-field role. |
 Venti | Venti exchanges Kazuha’s DMG buffs for unparalleled grouping and Energy for the Cryo DPS (as his Burst generally absorbs Cryo in these teams). Ayaka and Ganyu in particular appreciate his grouping. |
Cryo


Anemo


Example Teams
This is not a comprehensive list of teams. The inclusion or exclusion of any given team does not necessarily reflect its power level.

This team offers plentiful Freeze procs and buffs for Skirk. Furina can equip 4pc Tenacity of the Millelith while Kokomi holds TTDS and 4pc Scroll.
Sample Rotation
Furina ED N1 Q > Shenhe hEQ > Kokomi E N1 > Skirk combo

Kokomi offers good Freeze uptime and can hold TTDS and 4pc Tenacity of the Millelith for Ganyu. Variants where Kokomi uses her Burst to refresh her jellyfish are possible but require Favonius weapons on Venti and the Cryo flex.
Sample Rotation (Shenhe)
Shenhe tEQ > Kokomi E > Ganyu EQ > Venti EQ > Ganyu C > Shenhe tE N1 > Ganyu C E C > Venti E N1 > Ganyu C
Sample Rotation (Rosaria)
Rosaria EQ > Kokomi E > Ganyu EQ > Venti EQ > Ganyu C > Rosaria E > Ganyu C E C > Venti E N1 > Ganyu C

An efficient and comfortable Ayaka team. Kokomi should hold TTDS and 4pc Tenacity of the Millelith. Escoffier can forgo using her Burst unless needed for emergency healing.
Sample Rotation (Kazuha)
Shenhe Q tE > Kazuha tEPQ > Kokomi E > Ayaka D N1 EQ N2C > Shenhe tE > Ayaka D N2C > Kazuha tEP > Ayaka D N1 E N1C
Sample Rotation (Escoffier)
Escoffier E N1 > Shenhe Q tE > Kokomi E > Ayaka D N1 EQ N1CD 2[N2C] > Shenhe N2 tE > Ayaka ED N1C N2

This is less of a traditional Freeze team and more of a Mono Hydro team that happens to trigger Freeze. Escoffier provides a whopping 55% RES Shred for Hydro and Cryo damage, and can forgo using her Burst to build for damage since Kokomi already provides enough healing.
Sample Rotation (Yelan)
Escoffier E N1 > Furina ED > Kokomi E N2 > Furina Q > Yelan Q N1 E > Kokomi N1 Q combo > Yelan E N4
Sample Rotation (Xingqiu)
Escoffier E N1 > Furina ED > Kokomi E N2 > Furina Q > Xingqiu ED Q > Kokomi N1 Q combo
Electro-Charged and Lunar-Charged

Kokomi brings ample Hydro application to enable Electro-Charged or Lunar-Charged while also providing healing, allowing more offensive Electro and Anemo units to be used in the team without sacrificing comfort. The last slot will typically be taken by an Anemo unit for VV RES Shred, buffs, and grouping.
She can deal respectable damage through her Burst and OHC procs or provide buffs for her teammates through weapons and artifacts like ToTM, TTDS, and Hakushin Ring. When played on-field, she is a good driver for abilities like Beidou’s Burst or Fischl’s C6.
Since she cannot build for CRIT, she does not contribute much to the Lunar-Charged reaction, and building Kokomi for support is recommended in Lunar-Charged teams.
Notable Teammates
Electro
 Ineffa | Ineffa is an off-field powerhouse, dealing incredibly high damage and enabling the Lunar-Charged reaction while providing a sturdy shield. Her shield and Kokomi’s healing make their teams together very comfortable to play. |
 Fischl | Fischl contributes high off-field Electro application and single-target damage while requiring low field time. Her rapid particle generation is also useful for batterying other units. |
Ororon | Ororon is tailor-made for Electro-Charged and Lunar-Charged compositions. He provides full uptime on the 40% DMG buff from 4pc Scroll, gives Energy to the on-field character via his A4, and can out-damage Fischl in AoE. |


Hydro
 Columbina | Columbina enables and buffs all Lunar Reactions. She and Kokomi together enable Hydro Resonance, increasing both of their damage profiles, and she appreciates Kokomi’s additional Hydro particles to fulfill her often high ER requirements. |
Furina | Kokomi and Furina form a synergistic Hydro core for Electro-Charged teams, with Kokomi’s powerful healing fueling Furina’s large DMG% buff. They also enable Hydro Resonance to increase each other’s damage and lower each other’s ER requirements with abundant Hydro particles. |
 Yelan | Yelan provides additional single-target off-field damage, Hydro application, and a ramping DMG% buff. However, her Hydro application tends to be somewhat redundant with Kokomi, and her DMG% buff is less useful in Lunar-Charged setups. |

Anemo
 Sucrose | Sucrose brings EM buffs and moderate grouping, and can hold support weapons like TTDS or Hakushin Ring. She is especially powerful in Lunar-Charged setups due to her EM share. She can also be played on-field to trigger Swirl and Electro-Charged/Lunar-Charged with her Normal Attacks. |
Kazuha | Kazuha offers grouping, off-field damage, and DMG% buffs for Kokomi and Electro units with his A4 Passive. He is less recommended for Lunar-Charged teams, as they benefit less from his buffs. |
Venti | Venti brings Energy (typically for the Hydro units), unmatched grouping, and respectable personal damage. All of Kokomi’s Skills are able to hit enemies lifted by Venti’s Burst. |
Example Teams
This is not a comprehensive list of teams. The inclusion or exclusion of any given team does not necessarily reflect its power level.

This is a comfortable Furina Electro-Charged team composition with high damage contributions from all members, performing well in both single-target and AoE.
Sample Rotation
Fischl E > Furina ED > Kazuha tEP > Kokomi E > Furina Q > Kazuha Q tEP > Fischl Q > Kokomi Q combo > Kazuha tEP > Kokomi N2

Ineffa and Columbina are an off-field powerhouse, providing most of the damage in this Lunar-Charged team. This team is very comfortable to play thanks to Ineffa’s shield and Kokomi’s healing, making it well-suited for content with significant incoming damage. 4pc Clam performs well on Kokomi here, but with a well-invested Columbina, she can optionally hold 4pc SMS to free up Columbina for 4pc Aubade.
Sample Rotation
Kokomi E > Columbina EQ > Ineffa E (Q)¹ > Sucrose ED (Q)¹ N1 > Kokomi Q combo > Sucrose N3
¹Burst if available

This team places Kazuha on 4pc Thundering Fury, allowing him to spam his Skill on-field for significant damage. The rotation is flexible and can be adjusted to give Kokomi on-field time for healing as needed.
An on-field Venti variant is also possible if you have unlocked Venti and Fischl’s Hexerei passives.
Sample Rotation (TF Kazuha)
Fischl Q > Venti Q > Kokomi E > Kazuha tEPQ 2[N1 tEP] > Fischl E > Kokomi Q > Venti E > Kazuha N2 tEP N1 tEP
Sample Rotation (On-Field Venti)
Kokomi E > Fischl E N1 > Kazuha tEP N1 > Kokomi Q N3D N3 > Fischl Q > Kazuha tEP Q > Venti EQ N5D N5E N5
Limited Roster Alternatives
These teams are meant for newer players whose limited roster prevents them from using the teams above; as such, the teams below result in lower damage output.

This accessible Electro-Charged team is comfortable and effective. Lynette can be swapped out for Anemo Catalysts like Sucrose or Heizou for more consistent VV RES Shred uptime if she is not yet C4.
Sample Rotation
Kokomi E > Ororon EQ > Lynette EQ > Fischl E/Q > Kokomi Q combo > (Lynette E)¹
¹If Lynette is C4 and/or uses R4+ Sacrificial Sword
Overvape

Kokomi can act as an on-field Hydro enabler for off-field Pyro DPS like Durin and Xiangling. An Electro unit helps react off any excess Pyro and maintains an Electro-Charged aura for the Pyro DPS to trigger simultaneous Vaporize and Overload reactions, while Kokomi contributes solid damage and Hydro application on-field.
While Kokomi can provide off-field Hydro application for on-field Pyro units like Diluc or Yoimiya, it is often far easier to use alternative options instead with abilities that are not rooted in place like Kokomi’s jellyfish (e.g. Yelan or Xingqiu).
Notable Teammates
Off-Field Pyro DPS
Durin | Durin provides exceptional damage in both AoE and single target. When using his “white form” for AoE, he also shreds enemy RES to Pyro and the elements it reacts with (with the exception of Hydro and Cryo), increasing teammates’ damage. He prefers a second Hexerei character on the team to unlock his kit’s full potency. |
Xiangling | Xiangling has been well-known as a fantastic off-field Pyro DPS since the game’s release. Her main downside is her high Energy needs, which can be difficult if not impossible to meet without a second Pyro (usually Bennett) to funnel particles. |
Electro
Fischl | An excellent choice for the Electro slot due to her high single-target damage, excellent Electro application, and good particle generation. She also fills the Hexerei slot for Durin. |
Ororon | Ororon has great off-field Electro application and can provide full uptime on 4pc Scroll for a 40% DMG buff to Hydro and Electro damage. It is difficult for him to trigger a reaction to buff Pyro after the first rotation. |
Ineffa | Ineffa enables Lunar-Charged while contributing high personal damage and excellent Electro application. |
Flex
 Bennett | Xiangling’s best teammate, providing her with Pyro particles and a massive Flat ATK buff to snapshot onto her Burst. His healing is redundant with Kokomi’s, so he can be built for damage instead, with his Burst acting as a Vaporize nuke. |
Furina | Furina provides good off-field damage alongside a powerful DMG% buff, with Kokomi quickly and easily stacking her Fanfare. She can hold 4pc TotM to further buff the Pyro DPS. |
 Yelan/Xingqiu | Both provide significant Hydro application for more consistent vapes; Yelan also contributes a ramping DMG% buff, while Xingqiu gives Kokomi increased interruption resistance for a smoother gameplay experience and a small amount of Hydro RES Shred from his C2. Both appreciate Kokomi’s extra Hydro particles to reduce their often high ER requirements, allowing them to build for more damage. |
Columbina | Columbina does not directly buff the Pyro DPS, but rather enables and buffs the Lunar-Charged reaction, which can be a great contributor to overall team DPS. Works excellently paired with Ineffa. She and Kokomi buff each other’s damage via Hydro Resonance and reduce each other’s ER needs. |
Venti | In addition to the VV RES Shred he provides as an Anemo support, Venti’s strong grouping helps keep enemies in range of Kokomi’s jellyfish, improving her Hydro application. With an Electro-Charged aura on enemies, his Burst tends to absorb Hydro, adding further Hydro application and Energy regen for Kokomi from his A4. Care should be taken to avoid absorbing Pyro instead as this can lead to too much Pyro application and missed Vapes for the Pyro DPS. As a Hexerei character, he can activate Durin and/or Fischl’s Hexerei passives, and he contributes meaningful damage from off-field via Swirl and Electro-Charged. |
Kazuha | Kazuha provides a large DMG% buff to any Swirled Element in addition to the RES Shred from 4pc VV, and his grouping helps immensely to keep enemies in range of Kokomi’s jellyfish. Like Venti, his Burst tends to absorb Hydro, providing supplemental application across its wide AoE, but care should be taken to avoid absorbing Pyro. Kazuha’s Skill has an absorption mechanic and multiple hits of Anemo damage, which can sometimes allow him to achieve more consistent Pyro Swirls; see the Skill section of Kazuha’s extended guide for more. Even if not, however, the buffs to Electro and Hydro damage and his own damage contribution from Swirls and Electro-Charged make him a worthwhile choice. |
Sucrose | Sucrose can be a strong choice for Xiangling in particular due to her Guoba Swirl mechanic providing more consistent Pyro RES Shred. She also contributes a large party-wide EM buff with her A4, increasing reaction damage from Vaporize, Overload, and Electro-Charged. In teams with Sucrose, Kokomi is usually the better choice for holding TTDS, as she benefits from its HP% substat. Sucrose can hold an EM weapon like Sacrificial Fragments instead to increase her EM buff. |
Xilonen | Xilonen provides Pyro RES Shred that does not depend on Swirls, as well as RES Shred and buffs to Hydro and Electro damage via 4pc Scroll. When paired with Kokomi, though, her healing is redundant, and unlike Anemo supports she does not contribute off-field damage. |
Example Teams
This is not a comprehensive list of teams. The inclusion or exclusion of any given team does not necessarily reflect its power level.

Kokomi and Furina contribute plenty of Hydro for very consistent Vapes in this Durin team. Furina can hold Favonius Sword and 4pc TotM to help with Durin’s Energy and buff his ATK.
Sample Rotation
Kokomi E > Furina ED Q > Durin (2[E] / E N1)¹ Q > Fischl E/Q > Kokomi Q combo
¹For single target, use E N1; with multiple targets, use 2[E]

A team known in the community as “Sukokomon.” Takes advantage of Sucrose’s Guoba Swirl tech for Pyro RES Shred. For more details on how to play this team, check out Xiangling’s Extended Guide.
Sample Rotation
Fischl E > Kokomi E > Xiangling ED > Sucrose N1 E (Guoba Swirl) > Xiangling Q > Kokomi Q N3C N3D N3C > Fischl Q > Xiangling ED > Sucrose N1 E N2 Q N3¹
¹Spam N3 until Oz disappears

Fischl and Xiangling can both snapshot Bennett’s ATK buff, greatly increasing their damage.
Sample Rotation
Kokomi N2 E > Bennett Q E > Fischl E N1 > Xiangling Q ED > Kokomi Q 3[N3D] N3 > Fischl N1 Q > Bennett E > Xiangling N2 E > Kokomi N3D N3 > Bennett E

Venti and Durin are this team’s primary damage dealers — Durin via his Vaporized Burst hits and Venti via Swirl and Electro-Charged reactions. Kokomi uses her Burst to refresh her jellyfish and then cedes the field to Venti, whose Burst provides additional Hydro application and keeps enemies in range of the Bake-Kurage.
Sample Rotation (Fischl)
Kokomi E > Fischl E/Q > Durin (2[E] / E N1)¹ Q > Kokomi Q N3 > Venti EQ N5D N5E N5D N2
Sample Rotation (Ororon)
Kokomi E > Ororon EQ > Durin (2[E] / E N1)¹ Q > Kokomi Q N3 > Venti EQ N5D N5E N5D N2
¹For single target, use E N1; with multiple targets, use 2[E]
Hyperbloom and Burgeon

Kokomi applies Hydro to a Dendro aura to trigger Bloom and generate Dendro Cores; Electro and Pyro units can then apply Elements on these Cores to trigger Hyperbloom and Burgeon respectively. Kokomi’s healing and her on-field and off-field Hydro application make her an excellent pick in these teams. Kokomi should hold 4pc Deepwood Memories if no teammate is already using it, as her personal damage contribution is of much lower priority.
Kokomi’s comparatively slow Hydro application can generate Dendro Cores while maintaining a Quicken aura in some teams, making for a Quickbloom composition where damage from Hyperbloom is mixed with Aggravate and Spread reactions.
Notable Teammates
Dendro
 Nahida | The premier Dendro enabler, both on-field and off. Her A1 Passive provides a hefty EM buff for other on-field characters, but this is of limited usefulness in most Hyperbloom and Burgeon teams as the triggers tend to be off-field. Nahida’s biggest flaw is her need to be on-field to re-apply her Skill in multi-wave content, which can disrupt rotations. As long as it persists on enemies, though, her off-field Dendro application capability is unmatched. |
 Lauma | Lauma provides unmatched buffing capability for Bloom reactions: she shreds Dendro (and Hydro) RES with her Skill, buffs Bloom, Burgeon, and Hyperbloom damage with her Burst, and even allows Bloom reactions to CRIT via her A1, assuming she’s the only Nod-Krai character on the team. Combined with her excellent off-field Dendro application and decent personal damage, it’s hard to think of a reason not to use her. |
 Alhaitham | Provides high on-field Dendro application. His personal damage is greatly improved in Quickbloom teams, as he can frequently trigger Spread. |
Hyperbloom Trigger
 Raiden | A potent off-field Hyperbloom trigger due to her Skill’s quick proc rate, high uptime, and decent AoE. Her Skill can proc at range, which synergizes with Kokomi’s ranged Normal Attacks, and she provides a Burst DMG% buff to the team. |
 Shinobu | Shinobu is a great Hyperbloom trigger, but is slightly less synergistic with Kokomi than Raiden, as her Skill has worse AoE and lower uptime while her healing is redundant. |
Ineffa | Ineffa enables Lunar-Charged while also triggering frequent Hyperblooms, making her a powerful option. Her shield is somewhat redundant with Kokomi’s healing, however. |
 Anemo Units | Kazuha, Venti, Sucrose, Heizou, Ifa, Lan Yan, C6 Lynette Teammates like Fischl, who apply significant Electro aura to enemies without hitting many Dendro Cores, enable Anemo units to act as the Hyperbloom trigger instead by Swirling the Electro aura. |
Burgeon Trigger
 Thoma | Thoma is a highly effective off-field Burgeon unit thanks to his Burst, which hits in a cone AoE every second when the on-field character uses a Normal Attack. Kokomi’s strong healing allows him to build full EM for maximum Burgeon damage without worrying about his shield HP. |
 Pyro Traveler | With a Tap Skill that pulses AoE Pyro every second, Pyro Traveler makes for a good Burgeon trigger unit, but their AoE is smaller than Thoma’s and their Skill doesn’t last as long as Thoma’s Burst. However, they can opt to hold 4pc Scroll to buff the damage of their teammates, which helps make up the difference. |
Durin | Durin’s Burst hits in an AoE every second with full uptime, and he can also shred Dendro RES by 35% by occasionally proccing Burning, which stacks nicely with the 30% RES Shred from 4pc Deepwood. |
Flex
Fischl | Oz typically won’t target Dendro Cores unless there are no enemies in range, making Fischl a safe choice for additional DPS without stealing too many Hyperbloom/Burgeon procs. Her Electro application can be helpful in Burgeon to react off any excess Pyro that might otherwise consume the Dendro aura and limit Core generation. She also reduces team ER requirements with her ample particle generation. |
 Beidou | Beidou works best in Hyperbloom teams where there is another Electro unit to help battery her expensive Burst. Like Fischl’s Oz, Beidou’s Stormbreaker prefers not to target Dendro Cores, meaning she can contribute solid damage from off-field without stealing Hyperblooms. This is especially the case in Quickbloom teams where she can trigger Aggravate. |
Furina | Furina provides additional Hydro application for more Blooms, plus a large DMG% buff to benefit Kokomi and Dendro teammates like Nahida who deal significant Talent damage. She can hold supportive equipment like Favonius Sword and 4pc Deepwood to further bolster the team, freeing up the Hyperbloom/Burgeon trigger unit to equip more EM-focused gear. |
Yelan/Xingqiu | These units provide high single-target Hydro application, and more Hydro means more Dendro Cores. Yelan also buffs the on-field unit’s damage, while Xingqiu provides interruption resistance for smoother gameplay and a small amount of Hydro RES Shred from his C2. |
 Candace (C6) | At C6, Candace’s waves of AoE Hydro can significantly increase Dendro Core generation in multi-target scenarios, especially if enemies move out of range of Kokomi’s jellyfish. |
Example Teams
This is not a comprehensive list of teams. The inclusion or exclusion of any given team does not necessarily reflect its power level.

Lauma provides substantial buffs to Bloom reactions, including Burgeon and Hyperbloom. At least one Favonius weapon is recommended, as Kokomi and Lauma have high ER needs.
Sample Rotation
Kokomi E > Thoma EQ¹ > Lauma hE (Q)² > Fischl E N1/N1 Q > Kokomi Q combo
¹If Thoma is not yet C2, move him after Lauma
²Burst if available

This team emphasizes direct damage from teammates in addition to Burgeon reaction damage.
Sample Rotation (Fischl)
Fischl E > Nahida E Q > Kokomi E > Pyro Traveler tE Q > Nahida N2 E N2C > Fischl Q > Kokomi Q combo > Nahida E N2C
Sample Rotation (Furina)
Furina ED Q > Nahida E > Kokomi E > Pyro Traveler tE Q > Nahida N2C N2 E > Kokomi Q combo > Nahida N2C

Fischl activates Venti’s Hexerei passive, allowing him to be played on-field, while also contributing sufficient Electro application for him to trigger Hyperblooms via Swirl. Kokomi’s Skill provides enough AoE Hydro application for plentiful Dendro Cores, with the help of Venti’s grouping to keep enemies in range of her jellyfish. Note that Prototype Amber is required on Kokomi for this team, as her ER requirements are otherwise unreasonably high, and not using her Burst severely limits Dendro core production.
The rotation is somewhat flexible; Kokomi can stay on-field for a bit longer if more healing is needed, and teammates can weave in Normal Attacks to fill downtime and trigger Fischl’s C6.
Sample Rotation (Nahida)
Kokomi E > Nahida E (Q)¹ > Fischl E/Q > Kokomi Q N3 > Venti EQ N5D N5E N5D N2
Sample Rotation (Lauma)
Kokomi E > Lauma hE Q > Fischl E/Q > Kokomi Q N3 > Venti EQ N5D N5E N5D N2
¹Burst if available

A Quickbloom composition. Raiden triggers Hyperbloom while Beidou and Nahida contribute solid damage via Aggravate and Spread reactions. Kokomi makes a notable damage contribution through a combination of Talent damage and 4pc OHC procs.
Sample Rotation
Kokomi E N1 > Raiden N1 E > Nahida N1 E N2 Q > Beidou EQ > Kokomi N1 Q combo > Beidou E (N2)¹
¹Optional to allow Beidou to catch her own particles
Limited Roster Alternatives
These teams are meant for newer players whose limited roster prevents them from using the teams above; as such, the teams below result in lower damage output.

This is a great starter Hyperbloom team for new players.
Sample Rotation (Dendro Traveler)
Kokomi E > Shinobu E N1 > Fischl E/Q > Dendro Traveler EQ > Kokomi Q combo > Dendro Traveler E > Kokomi N3
Sample Rotation (Collei)
Kokomi E > Shinobu E N1 > Fischl E/Q > Collei EQ > Kokomi Q combo
Nilou Bloom

Kokomi provides AoE Hydro application to trigger Bloom, plus great healing to offset the self-damage. She often has high Bloom ownership, which encourages building high amounts of EM to improve her reaction damage. She is played on-field in the vast majority of Nilou teams, but can be used off-field in triple Hydro compositions (where her Bloom ownership is resultantly much lower).
Nahida and Lauma are the two best options for the Dendro slot(s), but free units like Collei and Dendro Traveler can also work. 4pc Deepwood should ideally be held by one of the Dendro units to allow Kokomi to equip a set that provides EM and/or buffs her Bloom damage instead.
Notable Teammates
Dendro
Nahida | The premier Dendro enabler, both on-field and off. Her A1 Passive provides a hefty EM buff for the on-field character, greatly increasing Kokomi’s Bountiful Bloom damage when she is played on-field. Nahida’s biggest flaw is her need to re-apply her Skill in multi-wave content, which can disrupt rotations. As long as it persists on enemies, though, her off-field Dendro application capability is unmatched, and Nilou Bloom teams are generally flexible enough to make re-applying it easy. |
Lauma | Lauma provides unmatched buffing capability for Bloom reactions: she shreds Dendro and Hydro RES with her Skill, buffs Bloom DMG with her Burst, and even allows Bloom reactions to CRIT via her A1, assuming she’s the only Nod-Krai character on the team. Combined with her excellent off-field Dendro application and decent personal damage, it’s hard to think of a reason not to use her. |
 Collei | Collei is a free unit with flexible bursts of Dendro application, primarily via her A1 and Burst. She works especially well with multiple grouped enemies. |
Dendro Traveler | Dendro Traveler is the other free option, providing consistent off-field Dendro application through their large Burst AoE. Choosing between the Dendro Traveler and Collei is largely a matter of personal preference, as their pros and cons are situational. |
Alhaitham | In Nilou Bloom teams, Alhaitham is played on-field to apply Dendro and deal direct damage via his Talents, so his synergy with Kokomi is typically limited to triple Hydro compositions where she can take an off-field role. |
Hydro
Most Nilou Bloom teams run two Hydro and two Dendro, but there are triple Hydro compositions that work, typically with an on-field Dendro unit like Alhaitham or Nahida.
Furina | Though her DMG% buff does not affect Bountiful Bloom reaction damage, Furina increases the direct damage of teammates like Nahida or Alhaitham and provides significant supplemental Hydro application. |
Yelan | Yelan provides a DMG% buff for the on-field character and consistent single-target Hydro application. Triple Hydro teams massively reduce her ER requirements, allowing her to build for damage instead. |
Xingqiu | Xingqiu’s Burst supplies a large amount of single-target Hydro, and his orbitals can also apply it to nearby enemies in addition to providing interruption resistance. The latter can be very helpful in triple Hydro teams that on-field Nahida, as she is easily staggered. |
Candace (C6) | At C6, Candace’s waves of AoE Hydro can significantly increase Dendro Core generation in multi-target scenarios, especially if enemies move out of range of Kokomi’s jellyfish. |
 Aino | Aino provides good off-field Hydro application alongside EM buffs from her C1 and 4pc SMS. At C6, she gives a small buff to Bloom DMG as well. |
Example Teams
This is not a comprehensive list of teams. The inclusion or exclusion of any given team does not necessarily reflect its power level.

This is a very powerful Nilou Bloom team that benefits from the full array of Nahida and Lauma’s buffs. The rotation is flexible and should be adapted to adjust to new waves of enemies (e.g. by re-applying Nahida’s Skill).
Sample Rotation
Nahida E Q > Kokomi E > Nilou E N2 E > Lauma hE Q > Kokomi Q combo

Before Lauma, the Kokomi-Nahida-Collei trio was widely considered Nilou’s best team, and it is still very potent (as is the variant with Lauma).
Sample Rotation (Nahida)
Nahida E Q > Kokomi E > Nilou E N2 E > Collei EQ > Kokomi Q combo
Sample Rotation (Lauma)
Kokomi E > Lauma hE Q > Nilou E N2 E > Collei EQ > Kokomi Q combo

A triple Hydro team with on-field Nahida. Bloom ownership tends to be mixed, so it’s a good idea to build some EM on everyone.
Sample Rotation
<rotation here>
Sample Rotation (Yelan)
(Nahida E >)¹ Nilou E N2 E > Kokomi E > Yelan EQ N1 > Nahida E combo > Kokomi Q N1² > Yelan E > Nahida E combo
Sample Rotation (Xingqiu)
(Nahida E >)¹ Nilou E N2 E > Kokomi E > Nahida E Q N1 > Xingqiu ED Q > Nahida E combo > Kokomi Q N1² > Nahida E combo
¹First rotation only
²Swap to refresh Kokomi’s jellyfish before it expires; timing is flexible
Other Teams

Kokomi’s healing and array of potential buffs from weapons and artifacts make her a good fit for many teams, especially when her Hydro application provides additional benefits such as enabling reactions.
Example Teams
This is not a comprehensive list of teams. The inclusion or exclusion of any given team does not necessarily reflect its power level.

Kokomi consolidates Hydro application and healing for Nefer. R5 Sacrificial Fragments is required for her in this team, as otherwise her Skill cooldown lengthens rotations.
Sample Rotation
Nahida EQ > Lauma tE Q > Kokomi E > Nefer combo

Navia’s flexibility allows Kokomi some on-field time for healing, quickly stacking Furina’s Fanfare for a sizable DMG% buff. She can also hold TTDS to buff Navia’s ATK.
Sample Rotation
Furina ED Q > Navia Q > Chiori (Q) 2[E] > Kokomi E > Navia E N3D N2 > Kokomi Q N2D N2 > Navia E N3D N2

Kokomi does significant damage on-field in this Mono Hydro team. Another variation exists with both Yelan and Xingqiu in place of Furina, but without Furina’s buff, the damage is significantly less.
Sample Rotation (Yelan)
(Furina ED)¹ > Kazuha tEP > Kokomi E > Furina (ED)¹ Q > Yelan Q N1 E N1 > Kazuha Q > Kokomi Q combo > Yelan E N2
Sample Rotation (Xingqiu)
Kokomi E > Kazuha tEP > Furina ED Q > Xingqiu ED Q N1 > Kazuha Q > Kokomi Q combo
¹In the first rotation, use Furina E at the start; otherwise, use before Q
Credits
Writer(s): madeofseaglass (Marvel)
Editor(s): luwunae
TC Contributors: MizuNeko, acerbus114, KQM staff
Transcribers: ilkuni
Team images made with the KQM portrait generator.